The following tutorial is to configure ZoneBuilder using your own CA-signed certificates.
General instructions for OpenSSL commands
- If you do not have OpenSSL there is an OpenSSL download and installation section at the bottom of this article. Complete that section to be able to follow this article.
- Run the Windows command line as an administrator.
- In the command line: Go to the OpenSSL program folder now located on your desktop. If you follow the instructions this is where your certificates will be output.
- Copy and paste the below commands including the full lines. Press enter to execute the commands.
- Ensure that you enter unique Common Names for the certificates when asked for this, ex. ZB CA cert and ZB client cert. The common names for the CA and the CA-signed client certificate cannot be the same.
- Limit the export password for the certificate to a maximum of 20 bytes (characters). These passwords are used during the installation of the certificates and are therefore sensitive.
You can create a temporary time-limited certificate to control how long a client can use the device.
Generating a CA certificate
To use your own certificates with the ZoneBuilder feature of SafeConsole you will need to upload a CA public key to SafeConsole. If you do not have one, you can create one with OpenSSL using the following command.
openssl genrsa -out ca.key 2048
openssl req -new -x509 -sha256 -config openssl.cnf -days 3650 -key ca.key -out ca.crt
*The openssl.cnf file location will depend on your system. Usually, one is included with the OpenSSL install, there is a link to such a file in the OpenSSL download and installation section. Changes to the config file are optional.
Adding a CA certificate to SafeConsole

1) Choose the correct Path for which you want to enable ZoneBuilder.
2) Go to the ZoneBuilder section
3) Select Certificates - marked in red in the above screenshot.
You can then add a new certificate. The certificate must be either a PKCS12 file or an X509 certificate. An X509 certificate must be either DER or Base64 encoded. Enter the password if applicable to the certificate. After the certificate is uploaded, select it from the dropdown menu.
Generating the CA-signed client certificate
You will now have to generate client certificates and push them out. The client certificate requires the following key usage: Digital Signature, Key Encipherment, Data Encipherment, and Key Agreement.
One way to generate these client certificates is with the following OpenSSL commands
openssl genrsa -out client.key 2048
openssl req -new -sha256 -config openssl.cnf -key client.key -out client.csr
openssl x509 -req -sha256 -days 1826 -in client.csr -CA ca.crt -CAkey ca.key -set_serial 01 -out client.crt
openssl pkcs12 -export -out client.p12 -inkey client.key -in client.crt -chain -CAfile ca.crt
Here is a video walkthrough enabling ZoneBuilder and creating certificates with OpenSSL
Installing the CA-signed client certificates
You will need to install these certificates on the client's machine. If you would like to share devices between teams then everyone on that team should have the same client certificate. The number of client certificates that you generate and how they are installed on your machines depends on how you want to use the feature. See this article for an example of how to install the client certificate.
Use Case 1 - Share devices without using the password
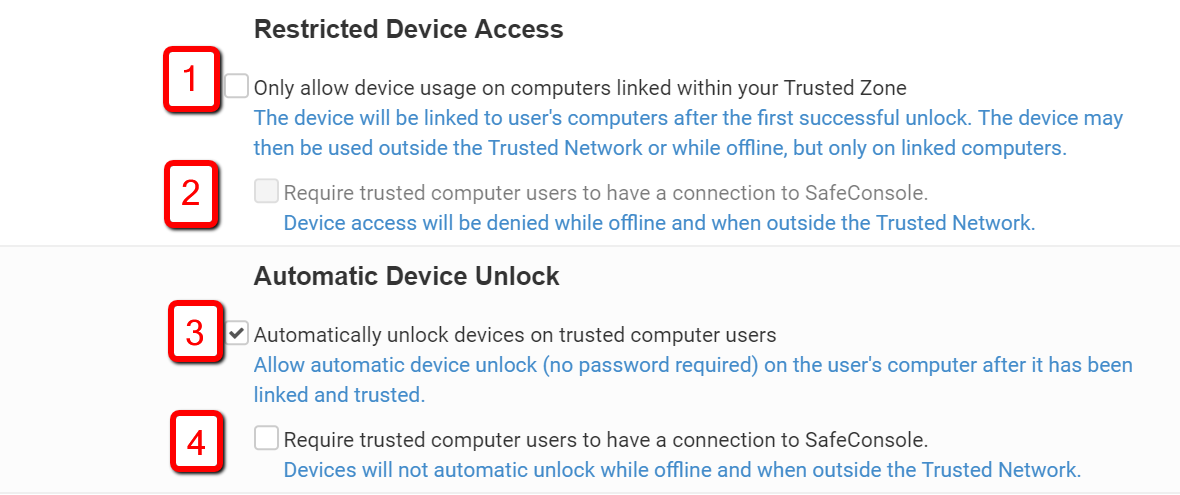
Share devices without using the password. Installing the same client certificate on multiple computers will allow the certificate to be trusted once, you can then take the device to any computer with that certificate and unlock it without the password. Please check box 3) and optionally 4) to enable this.
Use Case 2 - Two-factor authentication with password and certificate
Enable two-factor authentication by using both the device password and requiring the certificate to be installed on the client's computer when the device is used offline by enabling "Only allow device usage on a computer linked within your Trusted Zone" Please check box 1) and uncheck box 2)
OpenSSL download and installation
- Ensure to use OpenSSL version 1.0.2 or higher.
- Download: OpenSSL Windows binary download - this link is for one of the listed sites on the official Wiki for OpenSSL (visited 2017 November 9). More download options can be found here: https://wiki.openssl.org/index.php/Binaries
- Place the OpenSSL folder in your Windows desktop folder as this will ensure correct privileges for the commands and to avoid warnings.
- Ensure that you place an openssl.cnf in the folder. Configuring the openssl.cnf file is optional but it must exist. This is one example of such a file: http://web.mit.edu/crypto/openssl.cnf